photo home_zps6d4f0910.jpg photo home_zps6d4f0910.jpg photo preproduction_zps0aed42bb.jpg photo production_zps13a97b4d.jpg photo postproduction_zpsdab6d7fd.jpg photo theshort_zps5df2e33b.jpg photo videologs_zps4d0feed2.jpg photo contact_zps45cb7eba.jpg

Friday 31 January 2014

Pre-Production: Adult Barnabas Model Complete

Hello Peepz!,

Posting Format Mark2! Another character bites the dust! The Adult Barnabas 3D model is here!


Basic Character Turnaround passes are above!

Thursday 30 January 2014

Pre-Production: Adult Barnabas UV Maps

Hello Everyone,

It was that time again the other day when I sat down thinking jebus now the inevitable UV mapping spree that can scare the bravest of geeks. I sat poised at my computer wondering if I should just leave it to the girls to knock up but then a felt a lightning bolt hit me and before I knew it the model was unwrapped. Yes people Headdus is truly amazing and working in addition to a bit of Maya tweaking UV mapping can be a heavenly pursuit. I remember that this process used to be such a heavy chore but darting back between these apps I can create maps very quickly.

I had Barnabas's UV's done in about 2 hours it was just a complete breeze I had the programs working in perfect harmony. Every time I hit a twisty spot in Maya I would fire it over to Headdus and stretch the map and divide it further. I started getting the hang of the workflow after a short while and everything just quickly fell into place. The geometry of this model is mostly smooth. I am particularly happy with the layout of my Jacket. I never thought I'd get a model mapped so fast especially a character but I am pleased to say it is possible!

Anyway enough bragging lets check out the UVs for Adult Barnabas!


I have once again covered my bases by using the UV grid with a checker just to make sure nothing is overly stretched. I am not entirely happy with the Hat but then I think the hat is quite a circular object. Every time I would smooth the UVs of the hat things kept changing their minds. At one point the hat was happy the next moment it wasn't. In the end I got there though, I think it will do for this short. Everything else is neatly tucked away as the diagram above will show. I made a point to hide every seem in a hidden crevice or side tuck.

Pre-Production: Adult Barnabas 2D Turnarounds to 3D

Hello Everyone,

This is my first post as of the Major Project which means everything in the terms of the minor is finished. This is not to say that there are a couple of left over little bits and pieces from the minor Unit that went unfinished with the submission. This is where I will be correcting those little absences and to ultimately get the Major back on track (at least on any areas that are missing). One of the missing items from the Minor submission was the 2 adult character models - Barnabas and Bernard Badgersworth... They are my next exploits... Of course I have other priorities also!

Tomorrow I get into a bit of Rigging a desire which I have not explored in a while so it will be nice to see how I do this time round. Now that I have both the Benjamin and Barnabas Badgersworth models I have to prioritise getting those ready for when I am in Prague as Sammy wants to experiment with some pre-visualisation (blocking in shots, etc.). This is so that when we return we have an idea of how to shoot some of the scenes to use as reference for our eventual animation. This is the research segment as we will be using live action footage to get our animated frames.

Anyway lets get cracking on with the Barnabas Badgersworth Developments!

The image above shows my standard turnarounds with the model bound within. This is to show how close the final 3D geometry came to the 2D turnarounds. Obviously the ears were the biggest understatement within Barnabas's model. Never the less the shoes are probably my proudest achievement as they make the character look very dignified. He is much taller then you would otherwise think from these images. Once I have all of these there will defiantly be a couple of group posed shots for everyone to appreciate.

Friday 24 January 2014

Time Schedule

The studio has been MIA while working on our dissertations. With them all done and dusted our sights are set on the 2nd May - the submission date of our animation! Today the group have been working out the time schedule for the next 13 weeks, setting the deadlines for individual tasks and assigning those tasks to a group member. Here a spread sheet of our major project timings and task list.


Wednesday 8 January 2014

Art of and Disc Artwork

Art of

The white pages are intentional, as we planned to get it printed, it is in book format.


Disc Artwork


Turnarounds for Environments and Characters

This video is a compilation of all the turnarounds for completed sets/characters we have thus far.


Pre-Production: Young Barnabas 3D Expression Sheets

Hello Everyone,

Well I have reached my last post for this Unit and if I ever deserved a beer it would be now. 2 of our 4 characters completely explored conceptually. The only thing left to do for them is to get them rigged. I would also like to take this opportunity to thank my creative partners Sammy and Chrissie for doing such a stunning job with the environment and story development... It all looks amazing ladies I cant wait to animate it all with you. I honestly can say we couldn't have worked harder for this unit We all want this animation to be amazing and it really shows in all of our pre-production work... I cant wait to move beyond all of the pre-production....

We still have a little pre-production work to put together but considering the calibre of work on display I think it explains itself almost. There have been a few obvious snags in the modelling process (particularly with me). I was thinking too much about trying to get results in ZBrush rather then knuckling down and getting things done. I have learnt my lesson though so the next characters should be coming about very soon indeed. In the meantime I am going to take a couple of days off following this post.... I need to clear my head before diving right back in.

Anyway lets get down to my final post for this Unit... 3D EXPRESSIONS  WOOP!
The gif above are the 6 expressions I sculpted on the characters face within ZBrush. I then took the stills into Photoshop and turned them into composite renders. I then merged these expressions and ran them into a Photoshop timeline. The animation above is on a 0.3 second interval. 0.1 was too fast as was 0.2. 0.00 we don't talk about because you cant see it. Anyway I did this because it allows me to see the character animating almost with an obvious absence of in-betweens. Still it still feels like he is in motion... HE'S ALIVE!

Pre-Production: Young Barnabas Concept Weta

Hello Everyone,

I am back yes I am chain posting here but not without good reason. Following the success of my Benjamin Weta I sat down to knock up a pose/render worthy of Young Barnabas. I wanted something empathetic as these concepts are to reflect persona's more then actual settings. The expression on Barnabas made me consider my area of expertise DARKNESS MWAHAHA. Of course I realise this does not sit in our world at all but as I had the control over the concept I found myself wanting to go darker and darker until his suit sat in a dark frame. Now I know what you are going to say... it looks like a concept on abuse... Its not that - its to reflect the fear Young Barnabas had of his dad - Bernard.

I prefer to think of this concept as Barnabas's inner child being shut away and repressed as is Barnabas's artistic talent in our short. Its like I said theses are more about persona then portraying a scene or a message. Benjamin's Weta was happy and dynamic because that is who he is. Young Barnabas was told not to chase his dreams by his dad so he is on a downer. This is of course not that much different from his adult counterpart as he has lost his wife so that makes him more gloomy. I will see what happens with that one when I get to it. For now though please enjoy and DO NOT READ OUR STORY AS DARK BECAUSE ITS NOT!

Anyway let me show you the fruits of my labour, its always a fun ride!


The image above shows the end result of the composited layers. Its the only time on this brief where I have totally indulged my darker tones and it will probably be the only time when Chrissie and Sammy see him ha-ha. That being said I really do like the way he looks in this concept. I didn't actually do bad with the posing although there are some areas which still bother me... I wont point those out you are just going to have to guess... I really do love making these concepts using my models they are so satisfying to me.

Pre-Production: Young barnabas Textured Complete

Hello Everyone,

It is that time again with only today to go... I am just about to dump in a massive folder full of pngs into my partners drop box. Of course I have 2 more posts to go after this but we have to start getting the gears in motion. I don't think we have done too bad for the minor project deadline. I am a little gutted that I couldn't get the adult Barnabas done in time for this unit but hopefully it wont be far behind this deadline. I will be cleaning each model up once more before we commit to the rigging so that is something else on the docket but it wont take long once I have them all...

Now this post is about the textured Young Barnabas, these are not necessarily the final textures as they have to be surveyed by the lead artist Chrissie. I painted these models entirely by hand with a little help from some projection mapping. I painted everything possible but there are a couple of areas that still but me somewhat. It is actually weird this time around not to be using any bump maps... It more or less means that the texture painting has to be on top form. You have nothing to hide your ink so you have to go full on detail...

Anyway lets checkout the textured turnarounds for Young Barnabas Badgersworth
The animated gif above shows a quick render turnaround of Young Barnabas Badgersworth. The lighting in the scene is a bit strong on the blue front but I like the shadow vs. light values so I kept it in from the prior textured Benjamin turns. I am quite lucky that these eyes are not the final eyes as we are using nurbs. The painting is quite big for the eye and the iris is quite tiny. I also don't think its sitting in the middle of the eye so that's quite a big problem. My most proud feature of this paint job has to be the jacket... Much better shade then Benjamin's.

Monday 6 January 2014

Pre-Production: Benjamin 3D Expression Sheets

Hello Everyone,

I have another little extra to lay on everyone just because I couldn't resist and like I said modelling can fry my brain if I'm not careful. Basically I set out to make some bog standard basic expressions in ZBrush but found myself buying into a weta concept for each individual face. The expression tests quickly turned from 1 into 6 and I thought it would make for a damn interesting post. I even took the opportunity to play with the light settings within ZBrush to see what kind of results I got. It has opened my eyes to the possibilities!

Anyway after playing in ZBrush for a bit I had all of my expressions and passes then it suddenly dawned on me to try and line them up to make a really choppy but precise expression animation. This is what truly astonished me. Obviously the key problem is the lack of in-betweens but It was an experiment that went this far. This has also helped me gauge how I want the blend shapes for our character mesh to go so I am quite happy here. Anyway I will do this post and get cracking with other bits and pieces before diving back to modelling.

So here goes... lets check out these awesome 3D expression sheets!!!
The crude animation above was made in Photoshop from my complete render passed images. I made it into this after having a strange epiphany... I basically got the inspiration from watching "Only Fools and Horses" on television. The opening sequence where there faces are on stickers and it shows a couple of quick stills. I didn't think it would work as well as this but after lining up the lower end of the body the movement fell into its own. I guess its true what they say inspiration is everywhere if you know when and where to look ha-ha.

Pre-Production: Benjamin Concept Weta

Hello Everyone,

I been modelling most of today so I had to take a break but I thought I should use my time wisely so I sat down to knock out a composite concept of little Benjamin. Everyone who knows me know I love to explore the conceptual side of ZBrush. I love multi render pass images as you can tweak literally everything about the image. I enjoy working with concepts within ZBrush as you have all of your posing tools and the ability to render out passes at whatever size you want.

ZBrush is a concept artists dream if you ask me I prefer it to doing the drawing myself. After you have spent all of that time modelling to get your geometry correct why not have some fun? A composite render is built of multiple render passes which allows you to modify shadows and lights within a program like Photoshop. I love it for the sheer freedom, no strings attached the model doesn't even have to be UV mapped. I fully recommend it and for people that are curious I can give some advice on what to do if you want it :)

Anyway let me show you the fruits of my labour, its always a fun ride!


The image above shows the end result of this process, there are numerous layers that went into the creation of this image. They were blended together within Photoshop using blending modes and opacity. A number of FX controls were also applied as well as hue and saturation adjustments to change shadow tones. I dialled quite a few layers down to get this concept to where I was happy. The problem with doing these passes is when you first sit down to sort them out you don't know where to start. You have quite a few layers and you can only find the right combination by test after test.

Pre-Production: Young Barnabas Model Complete

Hello Everyone,

The next model in the line up is complete (well except for textures). From today onwards it is about the adult Barnabas (about time too). I know this model is sort of an adaptation but its required to tell our story so I'm chuffed. I will probably be readdressing a couple of things after the deadline hand in. I will see about sorting the hair out a little better and getting the top hat to fit better. I will also have Bernard to adapt from Barnabas but I don't think that will be too bad. The most difficult thing so far is getting the hair correct. I will have to invest in some advice when we get back :)

Still I am quite pleased with most of the model I don't think there is that much to fix beyond what we have here. The next step will be getting the textures perfect on each character and of course my chore will be rigging. I cannot forget to make an alternative Torso for Barnabas too as we have a slight costume change at some point in our short. I am hoping there will not be much of that though, I don't understand the concept of working out alternative geometry for a mesh. At least its only for one character in particular.

Anyway lets take a look at the Young Barnabas 3D model turnarounds woop woop!


The image above is my typical 3 pass system for animated pre-production gifs. The scene itself was lit with 2 ambient lights with the ambient shade turned right down. The wire pass of course is the only one which doesn't use light but contours to render the polygon edges. I'm sure all of my colleagues at UCA know that by now already, still I like to sound clever :) I edit these turns in after effects before firing them across to Photoshop to get them into the animated gif format. There has been an improvement in their exporting functionality gifs used to lag much more.

Sunday 5 January 2014

Pre-Production: Young Barnabas UV Maps

Hello Everyone,

Another round of UV maps to show off to the world. Who would have thought I'd be here already I guess I'm still in a little disbelief here. I am still working hard on the Barnabas model so hopefully the day for delivery (Weds) should still be okay. I plan to work solidly until I have him complete so we can get moving with other more pressing matters. When the minor project hand in is going on I will probably be MIA on the day, sleeping off this unit a little. I just found out we have another briefing on the Friday again I will see how I am doing. I don't want to be a zombie there ha-ha.

Anyway this post will draw a close to Young Barnabas's UV maps which are totally sorted on my end. If I have time I will try to drape them with a proper texture to do a nice character render. If not just know that it is there in spirit. What I don't get submitted for this unit I will submit for the Major project. I have rigging, a dissertation and a texture passes to sort out following this unit but they shouldn't be a major hitch. I have also just seen the timetable for the major unit its mostly self directed study I guess here we are told to go forth and "be amazing" as Phil would say...

Anyway lets take a look at the UV Maps for Young Barnabas woop woop!


The image above shows my process for testing the uv quality of my model. There is a standard checker matt which lots of people use to find little inconsistencies. There is also the UV grid option which does something similar showing seam placement and any and all distortion in the UV map. I like to combine the two usually projecting both on to each other. I find it helps to double up from time to time. The second image is the placement of my seams which is literally identical to Benjamin why? because this model is adapted from his mesh.

Pre-Production: Young Barnabas 2D Turnarounds to 3D

Hello Everyone,

I am hurrying to get up everything I can before the hand in on Thursday the Barnabas model should be ready too so keep your eyes peeled for that. In the mean time I have Young Barnabas ready to go to the next stage of development. The reason Young Barnabas is done is because he was a basic adaptation from the Benjamin Badgersworth model. Their clothing is virtually identical, the key difference are their proportions and obvious facial details. These were all addressed within ZBrush using the truly awesome move tool. Maya was revisited after for UV's and mesh clean up.

I have just watched Sammy's & Son Animatic V2 and let me just say I am still in awe, the story really grows on you the more you watch. Check it out on this post here if you have a moment! In other news I created another little video of my creating Young Barnabas from Benjamin. There are however some apologies due as I totally forgot to record earlier so you only get the bitter end. I do explain this in the video so you are probably best to check it out. I also used this time to fix some other minor flaws in the Benjamin model but its nothing major.

Anyway lets check out the Young Barnabas 3D turnarounds woop woop!!


The image above shows the 3D turnarounds draped over the profile images so you can see how close the geometry is to the turnarounds. The hair is and probably always will be a bit of a oversight as these images do not make for the consideration of the hat. Making the hair this big made it blow out of the top of the hat. This also meant that I had to be careful with how much hair to pull beneath the hat as doing so could move the hair beneath the head. I was trying to be considerate for the circumstances when they remove their hats.

Animatic Mark 2

Mark 2 of the animatic has arrived. I struggled to try and do the new opening sequence right but I think it works now. This new draft comes with the added the previously stated new opening sequence that features the mother.
The challenge was to tell the life story of her and Barnabas in as short amount of time as possible BUT also have some key details in there about the mother encouraging their creativity. This sequence I image to be still pictures but with a 3D element... a concept I've found hard to explain so I'll be creating an example to test the theory I have about how to do it. Another major alteration has been the 2nd (now 3rd) scene of the father working in his office. This now has the addition of Benjamin in the room with him. I think I strayed from this idea previously because I wanted to show the isolation between the two characters but after Phil suggested it I saw how it could actually work better. The father and son love each other but don't know how to communicate about their tragedy. This awkward scene where they're together yet still far apart now adds more depth to the relationship. The final addition is the cheered up funeral attendees. Phil suggested additional characters that enjoyed the shenanigans of Benjamin thus giving him incentive to continue at further funerals. Benjamin's goal is to cheer people up in the way his mother taught him... by smiling. Now these characters allow Benjamin to see he was successful.


There are a few adjustments that I still wish to make but they don't alter the story... just detail really:

- Moving clouds in the sky (as if on a stage set) It keeps the somewhat theatre atheistic.
- Benjamin needs a radio next to him in the office to show where the music is coming from... alternately it could be on Barnabas' desk and he switches it off when looking at the chair.
- When the sun goes down... make the scene go darker and drop moon and stars (as if on string) into the scene... then pull them out as the sun comes up. It just reaffirms the day change.

And Son - Environment Research & Influences


Saturday 4 January 2014

And Son - Environment Pipeline 13-14


And Son - Environment Pipeline 10-12


And Son - Environment Pipeline 7-9


And Son Environment Pipeline 4-6


And Son - Environment Pipeline 1-3

Stitch and Sammy Happy New Year! - my PC flatly refuses to render any more tif files, so although in reality the street is complete with pavement markings, lamp-posts and better lighting these renders are slightly bare and very blue.  The church and 3 characters are drawn and ready to be scanned in at Uni on Monday, and I'm hopeful about rendering the pre-vis at uni as well!


Pre-Production: Benjamin Textured Complete

Hello Everyone,

I thought I would get this up to show that I had a go at getting Benjamin textured. Also Lydia's comment on the last post inspired me to get a nice couple of renders of him. Barnabas is coming along, I'm hoping he will be ready by tomorrow or the day after. In the mean time I thought I would get this posted up, I am trying to get everything posted that I can before the deadline next Thursday. I have gone all out this time by even playing with a little lighting for these renders (something everyone knows is my weakness).

If the texturing isn't right or if the ladies want to redo it after this rush is over then they can I don't mind I just wanted to make sure it was covered for the deadline. I may even redo a couple of tonal things with it after the minor hand in. I'm sure if anything is overly wrong I will be schooled either by Alan, Sammy or Chrissie ha-ha. I would just like to say to everyone I did my best here and I hope it is acceptable. I will be focusing on Barnabas solely after this post, if there is time I will see about getting a Weta concept made of both but that's an extra my priority is turnarounds for key characters.

Anyway lets checkout the textured turnarounds for Benjamin Badgersworth
The image above shows the textured Benjamin Badgersworth in turnaround with a couple of light passes. He is a bit shiny in places but I wanted to keep a little shine on the surface of the model. This is easily resolved by changing the material to a lambert. As far as the paintwork goes I decided to try to keep the tones in the texture weaker as our art style is kind of "flat" as it were. Its like I said though if the ladies want to change it they can feel free. I have no doubt that our main decisions where this is concerned will happen when we combine the environment with the characters.

Thursday 2 January 2014

Pre-Production: Benjamin Model Complete

Hello Everyone,

Well here it is 3 for 3 and hopefully the last Benjamin modelling post. I have to get cracking with Barnabas today to be sure to get it done for next week. 
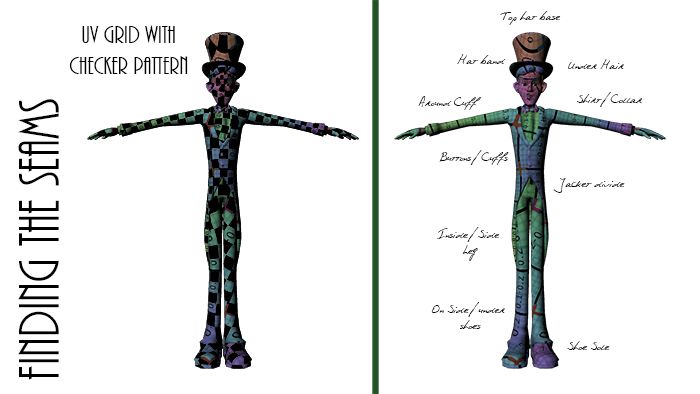
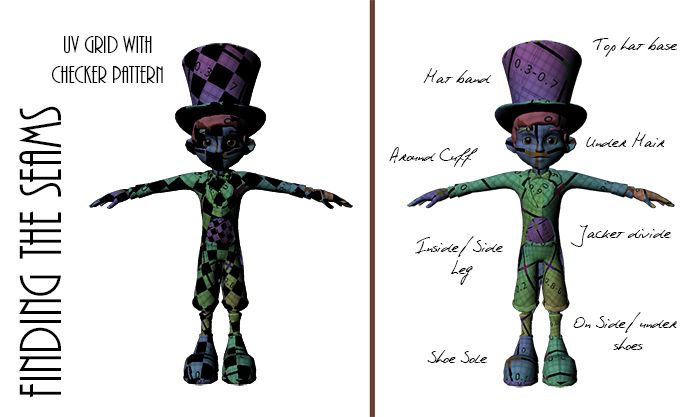
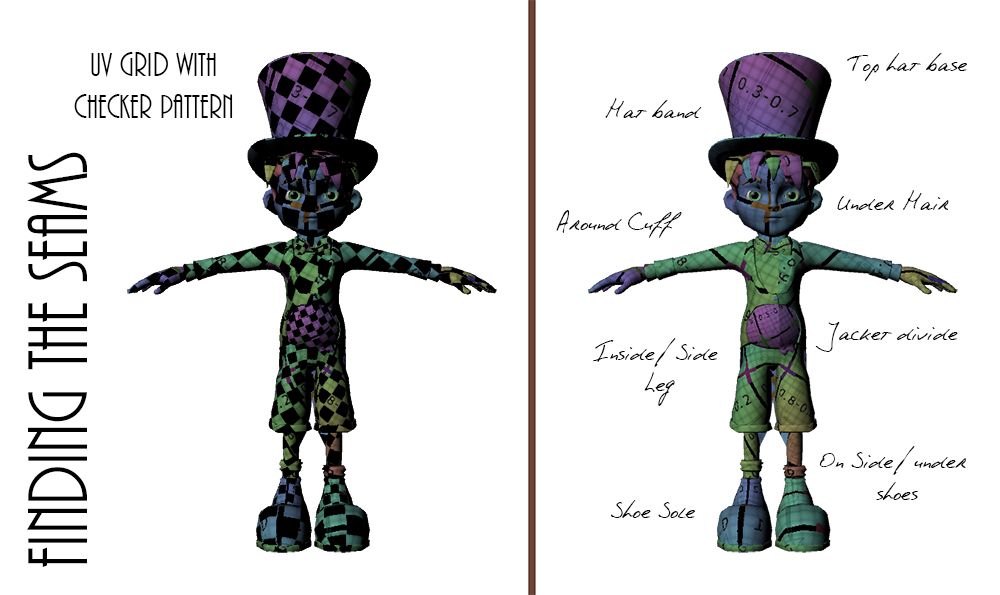
I have added everything to this model including a mouth box. The UV maps are also pretty tight and I'm really happy that I got to adjust the hair one last time because it was annoying me how flat his hair was. The problem with Benjamin having puffy hair is the top hat. Without changing its shape it makes fitting his head in a nightmare. I have got it to an acceptable level though... Maybe Alan can guide me later.

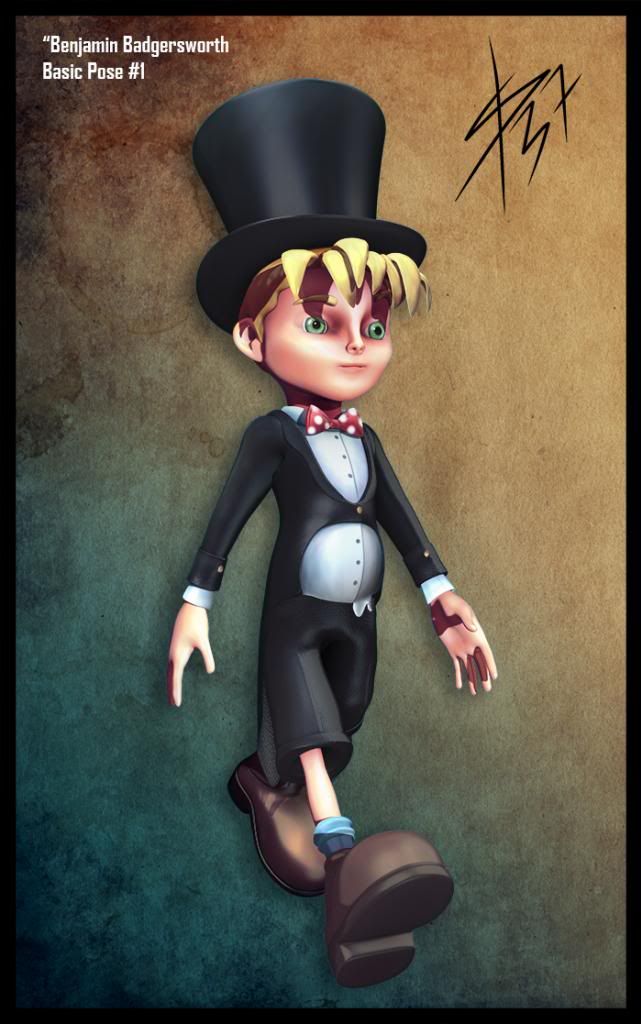
I thought I would conclude this model on my end in classical style doing a couple of nice turnarounds in the form of an animated gif. If there is time towards the end I will see if I can get a Weta concept out of him but my priority is getting the models present for the hand in next week. This unit has been a bit of an emotional rollercoaster. There has also been a few other slow moments, things always seem to get difficult over Christmas. I kind of miss my wide family, we have been splintered since the loss of my old man... Hey-ho.

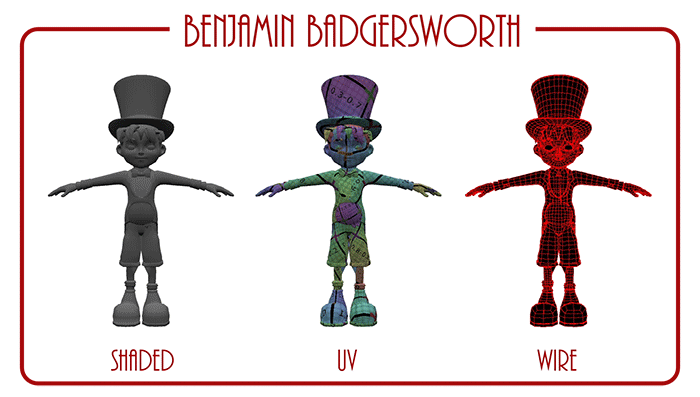
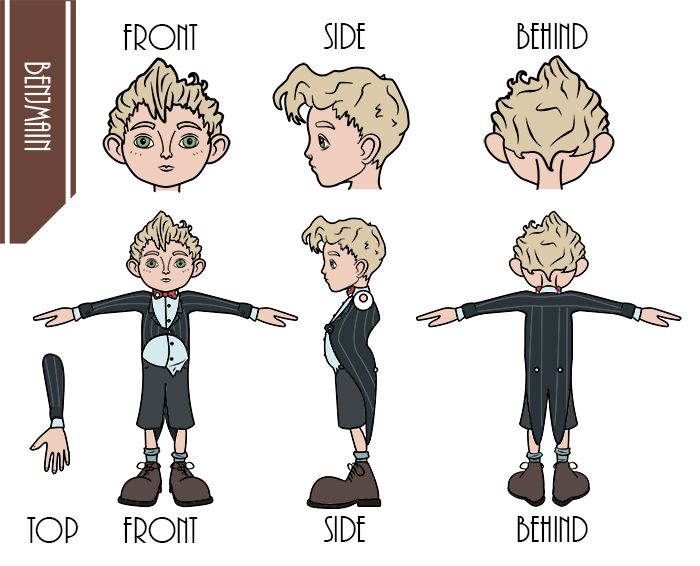
Anyway lets take a look at the Benjamin 3D model turnarounds woop woop!


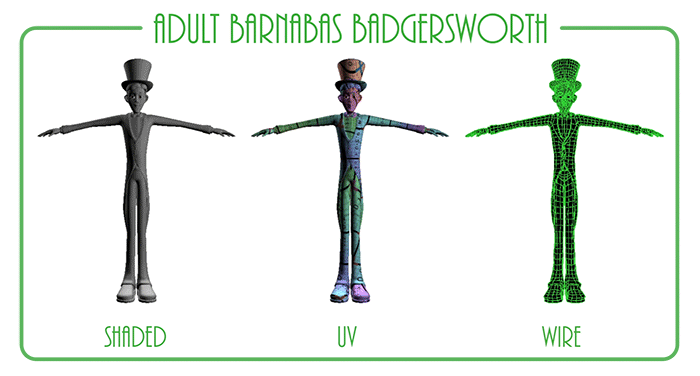
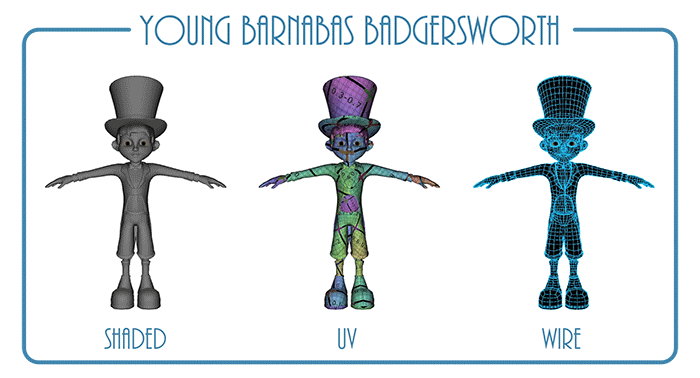
The image above shows 3 turnaround views of the Benjamin 3D model. The shaded view shows the model in its generic glory. 
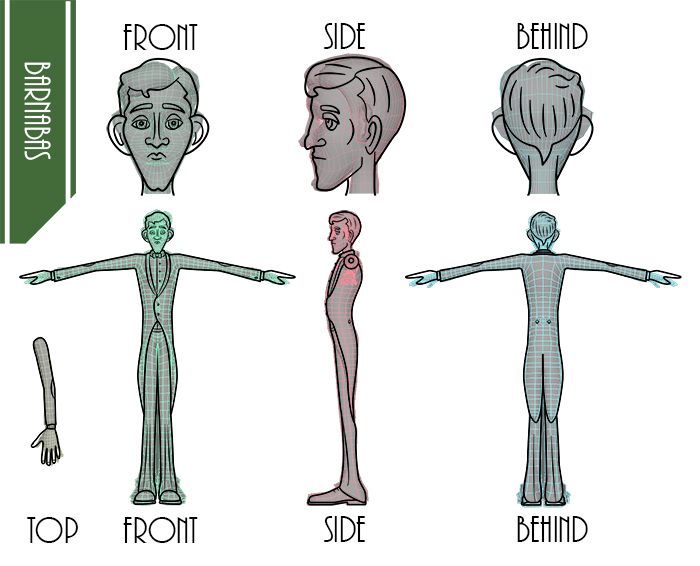
The UV view shows the seem placement and the quality of the UV Mapping. The Wire view shows the flow of the geometry itself as well as the consistency of its edge flow. Its handy to see these views before seeing a model in its entirety, well I feel it does. It allows you to appreciate what the end result is when you consider everything that is going on underneath. I have started making a habit of doing this... it only helps ;)

Wednesday 1 January 2014

Pre-Production: Benjamin UV Maps

Hello Everyone,

I am back writing another post I am a little annoyed as blogger keeps deciding to delete what I type in here so this is actually my second time doing the same post. The other week I knocked up some UV maps for Benjamin just to see how long it would take me. Luckily enough it only took a day so I'm confident that when I sit down to do Barnabas's we should be okay. I have knocked up another Operation Z video to demonstrate the ZUV's on our little Benjamin model. I'm hoping that having done the UV's will allow the girls just to focus on getting him textured.

We don't have long to get quite a few bits done by next week but I am confident that we will get everything to a high standard. I tried to keep Benjamin relatively low poly so we could go up freely, as Alan said you want to place your detail where you need it. Subdividing will only add to the quality of your detailed areas. The UV mapping is also simpler as you have less points to map especially if you can easily bump it up to increase the quality of your model. Still its been weird getting back into everything, I'm hoping things keep coming thick and fast.

Anyway lets check out the UV Mapping for Benjamin Badgersworth Woop Woop!


One of the things I tend to do when UV mapping is throw some kind of texture on to see if the polygons on the model are working effectively with the texture. I usually throw on either a checker or a UV grid texture which can be found on google. In the image above I have shown my Benjamin model and have identified some of the more obvious front on seams. Myself and my business partner have a little game we play when looking at game models, we like to see if we can identify the locations of the seams... Geeky I know but I guess we don't care.

Pre-Production: Benjamin 2D Turnarounds to 3D

Hello Everyone,

There will be another little flurry of posts tonight as I am attempting to get Benjamin off of my shoulders... this has been a bit of a war. Never the less I haven't been sitting here doing nothing all of Christmas let me tell you that much. There has been a bit of a war brewing since I set off to do a ZBrush feat but it ended up slowing me down, a hard lesson to learn but what can you do. I spent last week getting this model finessed and having just figured out how to get the hair properly mapped I can tell you that I am happy with it now.

I still have Barnabas to go but I think having learnt a few things the hard way I should have him in a day or two for you all to ogle at. In the mean time I thought I would get posting, get the Benjamin model signed off on my end ready for texturing. I have to talk to my creative partners about their involvement in that as I know that was something Sammy implicitly wanted to be involved in. I also created a little video of my battle with this model - moments particularly involving ZBrush. I am happy that I have got one out of the way though...

Nothing ventured nothing gained... Anyway it is here now so please enjoy!!

The image above shows the original turnarounds I worked from with the wire of the model projected over the top. I corrected his podginess mostly as Sammy and Chrissie didn't want him to have a beer belly (which was in the original turnaround). I agreed though, it didn't look right on the side profile. The other misguided move was his hair which I made puffy like the turnaround but then the hair kept bleeding through the top of the hat. I ended up having to severely flatten the hair to make the hat rest on the sides of his head. This took a while to sort out...

Pre-Production: Flesh to Final Turnarounds

Hello Everyone,

I have been working my ass off to get everything complete and while I still have a little ways to go I am happy that I am producing something which is acceptable to me. Those of you that know me know exactly how fussy I can be especially when it comes to characters ha-ha. Anyway I have been doing a bit of modelling and stuff but the other day I wanted to finally post up our turnarounds. So I sat down and got all of those to an acceptable level and thought Id do a whole post on them. For those of you keeping score this should be the last bit of 2D work I produce for this project.

Now I have 2 images to post per turnaround because I thought it was valid that we see the whole point of the skeleton turnarounds I knocked up in the prior post so let me explain... If you look closely at the "Stage 2 Adding Flesh To Skeleton" images you will see the skeleton underneath. All I did was essentially draw the flesh over the joints of the skeleton. These acted as my guides for the turnarounds and they are incredibly useful. The word isn't on these but "Stage 3" is essentially adding clothes and creating the turnarounds.. You can see the end results below.

So let me show you these turnarounds so we can finally get to CG.

The image at the very top of this is the underline anatomy of the character Benjamin is slightly podgy but Sammy and Chrissie didn't have an overhanging Belly in mind so I overshot that one. Still they corrected me and I corrected the flaws in the final turnaround. You may notice some differences in Benjamin's facial features from the original. There were a couple of issues with the side profile which made the front not line up properly so I went in and fixed most of the problems. The colour was something I thought worked but the ladies will be texturing I think...